Google Calendar is a fabulous (and free) tool for educators.
Not long ago, the only reminder I got about my dentist or doctor appointment was the appointment card they handed to me at my last visit. I had to look in the back of my library book to find out when it was due.
Technology, however, has changed such reminders. Doctors, hair stylists, and libraries now often use digital reminder systems. My dentist, for example, sends me an email a couple of days before my scheduled appointment, asking me to click the link to confirm that I’ll be there.
Since our students and their parents are conditioned to being given digital reminders, educators should learn how to utilize technology to provide a similar service. If educators pick a method that works for them, they’ll likely enjoy the saved time and improved results.
I’ve found Google Calendar to be very user-friendly. Some universities and K-12 schools already use Google Calendar. The University of Minnesota is but one example of many post-secondary institutions using Google Calendar. An example of a high school using Google Calendar is Ann Arbor’s Pioneer High School. My own K-12 district does as well.
The University of Minnesota’s page for students on using their Google Calendars.
Many people use Google Calendar for personal use. A parent of one of my high school students created a Google calendar to track his family member’s activities and even added reminders about home responsibilities. He added the calendar to his and his children’s smart phones so they would get reminders about their events.
Besides the fact that parents and students are often already familiar with online calendars and reminders, educators should create a Google Calendar for classroom use for several reasons:
-
Lesson plans and objectives can be added quickly from any computer (and most mobile devices) with internet access.
-
As teachers get more experienced using Google Calendar, they can embed their calendars on their classroom websites.
-
Advanced users can add their Google Calendar to the smart phones and help students and parents subscribe to the classroom calendar so that they can set up reminders on their devices.
-
Educators can use Google Calendars to share schedules with colleagues, from computer lab schedules to athletics practice.
I’ll address items 1 and 2 today and discuss 3 and 4 in another blog post.
1. Adding Your Lessons & Objectives
In my district, for example, teachers are required to put lesson plans and objectives on their teacher websites. Typing these plans in a document and uploading them to one’s website is laborious and time-consuming. Unlike such a document, a Google Calendar can be continually updated as changes occur from any computer with internet access. One can even edit the calendar from most smart phones!
The first step is creating a Gmail account if you don’t already have one. Once you’ve got an account, log-in, then select “calendar” on the menu at the top of the page. Each Gmail account comes with a calendar, so one could simply start adding events. Before adding an event, orient yourself by exploring the buttons, such as “Day”, “Week”, and the settings button at the top right of the calendar screen. Also check out the menu on the left. See images below:
-

-
Navigate to different months at the top left of your screen, and use My Calendars to show or hide certain calendars.
-

-
The menu buttons at the top right show options for viewing your calendar, as well as printing and changing settings.
A. Decide if you need more than one calendar or not.
First, you’ll want to decide how to organize your events. If you’re a secondary teacher and teach more than one course, you can create a new calendar for each one (easier for students who only want to see information for the course they’re in) and name the calendar after that course.
You could use your original calendar for professional or personal events. For example, I might have an English III calendar, a Journalism calendar, and a professional development calendar.
Now don’t get overwhelmed – our initial goal is to simply set up one calendar for one subject. Once you figure out how it works, you can set up more as you have the need. To create a calendar, simply click on the drop down menu button next to “My Calendars” on the left side of your screen and choose “Create New Calendar”.
Name the calendar after whatever class you’re creating lessons for. I’ll add to my English III class calendar for this example.
Notice that you can view all your calendars (once you have more than one) or just one of them. To view only the calendar you’re working on, make sure the box next to it (on the menu to the left of your screen) is color, which means you’ve selected it. You can click on each of your calendars to select/deselect it. Any other calendars should not be selected.
B. Add an Event/Lesson
Next, add an event by clicking on the date and time that event will occur. I’m going to add an English assignment for January in this example.
A quick and easy way to add events will pop up once you click on your calendar, but that won’t provide reminders or other features, so choose “Edit event”. While you can set it up as your needs dictate, I put each item we’re working on as a separate event.
The “Event Title” is what will show up on the calendar itself while one must click on the event to see the “Description”. Therefore, I put the lesson or assignment as the title and then add the objective or Standard in the description. Here’s an example:
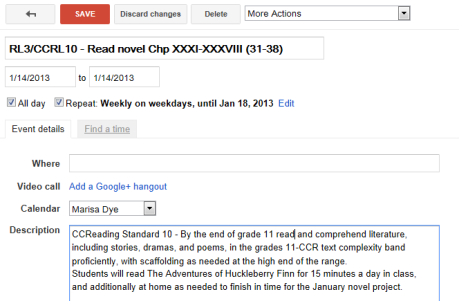
An example of a 11th grade English class entry.
If an event repeats, set that event to repeat within the calendar so you don’t have to re-enter it for each occurrence. For example, my students are responsible for reading certain chapters of a novel each week, so I repeat that event for each day of that week. In the image above, you’ll see that the box next to “repeat” is checked and the end date is shown. Click “Edit” if you wish to change the dates of the repeating event.
C. Adding Colors and Reminders for the Calendar Owner (Educator)
I like to color code my lessons. For example, lessons are green, formative assessments are purple, and summative assessments are are orange. That way I can see due dates at a glance. However, they are all the same color on the calendar the students see, so this is optional.
You can choose the color of the event clicking on it. If you don’t, you’ll just have the default color.
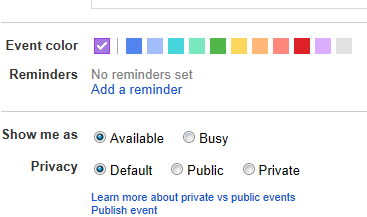
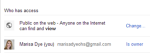
If you wish, you can color-code your events (or just leave it on the default). Be sure to change your privacy settings to “public” if you want others to be able to view your calendar.
If you wish to get email, text, or pop-up reminders from this calendar, you’ll want to add a reminder. Choose “add a reminder” below the color choices on the event editing screen. If you choose email reminder, a reminder will be sent to your Gmail account when you specify. If you choose pop-up reminder, you’ll get a pop-up reminder if you have your calendar set up on your smartphone or if you install Google Desktop on your computer.
The privacy settings allow you to decide who can view your calendar. If you want to learn more about the settings, select “Learn more about private vs public events”. Since you likely want students and parents to be able to view your calendar, select “Public”.
Once you’ve edited your event to your liking, click the red “save” button at the top. You should now see your main calendar screen with the event added. Success!
D. Test It
If you’d like to confirm that you can access this calendar from any computer with internet access, log out of your Gmail account and close your browser.
Then, switch to another computer with internet access (whether at work,at home, or your public library). Open the browser and log back into your Gmail account. Once again, select “Calendar” from the menu at the top. Navigate to the date of the event you added to confirm that it’s there. If it isn’t, make sure you have selected the correct calendar and the box next to it is colored.
E. Add More Events
Now you can add more lesson plans, events, and calendars as needed. Just make updating your lessons on your calendar part of your weekly routine!
2. Sharing Your Calendar
If you want students, parents, colleagues, and/or and administrators to be able to view the calendar you just created (along with any changes you make to it in the future), you’ll need to embed it in your classroom website, as shown below:
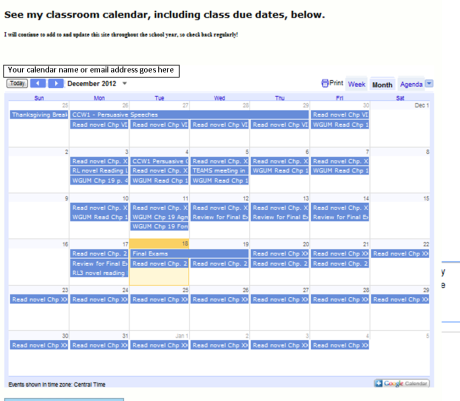
This is the calendar embedded on my classroom website.
A. About HTML
HTML is the code used to make websites. Most schools use software to “code” the websites so we don’t all have to learn coding (leave that to the IT department). Google Calendar will provide you an html code to automatically embed your calendar on your website.
B. Get the Code
First, you’ll need to get the code from your Google Calendar. While logged in on your Google Calendar, select the calendar you want to embed on the menu at the left by clicking on the down arrow button next to it. Choose “Share This Calendar”.
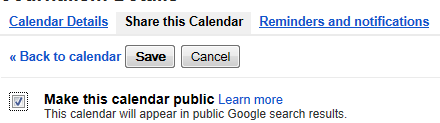
Sharing options for your calendar.
On the screen that pops up, select “Calendar Details” at the top. About half way down, you’ll see “Embed this Calendar” with a code provided in a box. Select the code, making sure you get all of it. Right click to copy it onto your computer’s clipboard.
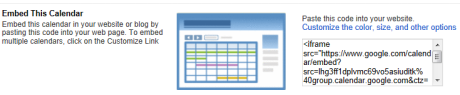
Google Calendar produces an html code so you can embed your calendar.
C. Embed the Calendar on Your Website
Then, go to your website. Decide where you want to place the calendar. I put mine on the homepage so it can be easily found. Use your website’s software to begin to “edit” the page you selected. Finally, click in the exact location on your website in which you want to embed your calendar.
My website software allows me to click an “html” button at the bottom left of the “Edit” screen. If you can switch to html, do so first. Then simply right click and “paste” the code for your calendar onto the page. Save your changes. Be sure to check your web page either by using the preview (mine is called “View page”) function or by logging out of the software and viewing your page as a visitor. You should see your calendar and its events displayed there.
The Wrap-Up
Now, each time you update your calendar, whether from a computer or a smartphone, the changes will appear on this embedded calendar. That means you only have to embed it once (unless to decide to move it to another page or delete it). Just remember that once you embed it, if you forget to update it, visitors will see a blank calendar on your website.
My next blog will detail uses of Google Calendar for advanced users, such as group collaboration, helping students/parents subscribe to your calendar and getting notifications from other calendars you’ve subscribed to. I hope you’ll join me!