Teacher portfolios have been around for years. Pre-service teachers use them to gain admission to graduate school and apply for a position. Experienced teachers may use them as candidates for Teacher of the Year, or, increasingly, to demonstrate teaching effectiveness for evaluations by administrators.
Why digital?
Digital portfolios have several advantages over the traditional binder version:
- They can provide an impressive example of an educator’s proficiency with technology
- Privacy controls allow teachers to specify and monitor who sees their portfolios
- No cost for printing/copying/binding
- instant access for anyone with a computer and an internet connection
- They can grab attention through interactive elements
- Many universities now require educations majors to have digital portfolios
Timeline
It is unrealistic to expect to create a polished teacher portfolio in an hour or two. Instead, consider it a work in progress, like a scrapbook of your career. Most experienced teachers already have a resume prepared, so we’ll start with that first. Second, we’ll add a page on which you can place artifacts to showcase your teaching abilities. Finally, we’ll set your privacy settings and I’ll share some resources if you want to expand your portfolio.
Hosting
There are innumerable web sites that offer free or low-cost possibilities for teacher portfolios. Google Sites is a popular choice because it is free, user-friendly, and, once you’ve mastered the basics of setting up one Google Site, you can make sites for many other purposes, whether for classroom or personal use. Below, I’ll walk you through how to get started.
Site Set-up
First, log into Google.com with your Gmail account. Then go to sites.google.com or (you’re logged in if your Gmail is at upper right corner), type “Google sites” in the Google.com search box.
Choose red “create” button (top left), then choose a template:
-
-
Click “Create.
-

-
Choose a template.
Name your site (this will be your domain name and you can’t change it later, so make sure you’ll be happy with the name for years) and select your theme (color, font, design scheme). You can change your theme later if you wish.
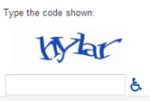
After you type in the verification code at the bottom of the screen, select “Create Site” and the information you just put in will pop up as a basic website template.
-

-
Name your site (be careful – you can’t change it later).
-

-
Choose a theme.
-
-
Type the verification code to prove you’re human.
How to edit a page
To edit a page, click “edit page.”
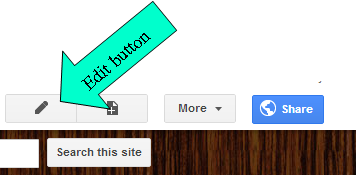
The edit button looks like a pencil.
When you do, it allows you to type in the Title bar and in the Body bar. The format tab allows you to change the appearance of font and alignment of font. The layout tab allows you to add columns to the body of your site. I recommend starting with a resume page because it’s easy to do if you have a resume already typed and saved.
Making a resume page
To make the resume page, choose one of your new site’s pre-made pages or follow the directions below to create a new one. Click the edit button, then, in the title bar, type whatever you wish to name your resume page, such as Resume, My Resume, or Cleatus T. Justice’s Resume.
Then open your resume document. Select all of the resume text and copy it (control-C on the keyboard or right-click to select “copy” with your mouse). Paste it (control-V on the keyboard or right-click with your mouse and choose “paste”) into the body section of your resume page. You will probably need to adjust the font and formatting so that it is easily readable. Don’t forget to click “Save” at the top when you’re finished or you’ll lose your changes!
How to create a new page
To create a new page, click “create page.” There are several page options, but the easiest to work with is “web page.” You will need to create a page name (which becomes part of its URL) and then choose whether or not you want the page to be directly under the main site (top level) or if you want it to be a sub-page of a page of your site. If the part of the site that you want your page to be under is not the default option, select it by clicking “choose another location.” Once you have chosen the directory option, click “create page”. Then edit it.
Creating an artifacts file cabinet
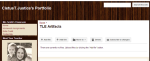
The second page I recommend experienced teachers create is for artifacts that demonstrate effective teaching. After you click “create page”, choose “file cabinet”.
-

-
Making an artifacts page using a file cabinet page template.
-
-
A sample artifacts page ready for examples to be uploaded.
Once you’ve made your file cabinet, you’ll want to set up some organization. I made a folder for each of the items evaluated in our district’s teacher evaluation rubric. An administrator can’t possibly observe each item in one short class period, so it is helpful to provide him or her with uploaded examples of each skill he or she is looking for.
Privacy settings
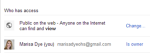
If you don’t want your new partial portfolio out there on the web for public viewing, the blue Share button on your Google Site (top right corner) comes in handy. Click the “share” button. A window showing the “Public on the Web” setting and you as the owner will appear. Next to the words “anyone on the web can find and view”, click “Change”. You can then change your privacy settings as you see fit and save. When you’re ready to share your portfolio with others, go back to these settings and change them as needed.
-
-
Changing your sharing options is easy!
-

-
The three options for who can see your site.
Just getting started?
If you’re new to making a website or portfolio, pace yourself! Don’t expect to have an extensive portfolio overnight. Prioritize which aspects of your online portfolio are the most important to complete first, and set SMART (Specific, Measureable, Attainable, Realistic, Timely) goals for yourself. A sample goal for an experienced teacher new to technology might be to select and upload one good example to the artifact page on your site at the end of each school day.
As you continue to work on your portfolio over time, consider adding other page titles/content, such as:
- Philosophy of Teaching
- Curriculum Development
- Teaching Skills
- Learner Assessment
- Continuing Education
- Honors and Awards
- Long Term Goals
Teacher portfolios should be considered works in progress. Expect to modify your portfolio as your needs change. If you’d like to add more visually interesting or multimedia elements to your portfolio, browse the sample portfolios linked below for ideas and check out the list of other Google Sites tools you can use on your portfolio site.
Other tools in Google Sites for further exploration
The table tab allows you to create and manage a table in the body of your site.
Use the Insert tab to add pictures, presentations, word documents, spread sheets, slide shows and links to other sites. You can add images manually, if you wish, by uploading them to the site. However, make sure you only upload what photos you intend to use for the page you are currently editing.
You can manually add files and documents by attaching them to the website under “attachments” at the bottom of the page. Again, just like the pictures, you must only upload what you want on that particular page and repeat the process for any new pages.
To fully take advantage of these you may wish to use Google Drive. When using Google Drive, you can upload spreadsheets, presentations, and documents for other people to view and to incorporate into your website.
You can also include “gadgets” such as news tickers, mp3 players, feeds, weather, etc. You can see the list by selecting “more gadgets” at the end of the Insert tab.
Links to sample digital portfolios
K-12
http://www.tammyengert.com/
http://carnaghiteachingportfolio.weebly.com/
http://home.comcast.net/~scottmerrick/portfolio/
http://bryanripleycrandall.wordpress.com/
https://sites.google.com/site/andiglombitzateaching/
http://prezi.com/vgq9r80yjcrd/beth-kelleys-teaching-portfolio/
University
http://oklportfolio.wordpress.com/
http://sites.helenbarrett.net/portfolio/
Other sources
http://rlafleur.myweb.uga.edu/latn4770/teaching%20portfolios/Creating_a_Portfolio_Website_with_Google_Sites%5B1%5D.pdf